Did you know that you can print out my digital products and use them to create paper layouts and pocket pages? Yes you can!! Hybrid scrapbooking is using digital files to create paper layouts and projects. You have to print and cut the embellishments and papers first. Then you use the printed elements, journal cards and papers for making a traditional, paper layout, or slide them into a vinyl, pocket sleeve. Both are beautiful alternatives to digital scrapbooking.
So how do you get started with hybrid scrapbooking? You need 4 things:
-
A method to organize and resize your embellishments prior to printing. You can use a scrapbooking software like Photoshop Elements, or the design software included with your Cricut or Silhouette cutting machine, or something like Word or Powerpoint. You can also print out the 8.5×11 printable PDF files included with the journal cards, snippets, pocket and word flair packs.
-
A printer. There are lots of choices for printers. Most popular brands are HP, Epson and Canon.
-
Cardstock paper. It’s better to use a heavier weight paper than plain printer paper.
-
A cutting tool. You can use a cutting machine from Cricut, Silhouette or Brother. You can also cut items out with scissors or a paper trimmer.
We recently added 3 new hybrid artists to my Creative Team: Cassie, Esther and Jennifer. These ladies are so talented and have been very busy creating some beautiful pages to share with you!

Let’s start first with Pocket Pages. CT member Cassie created these pocket pages using the Reservations Artist Point and Start Your Engines collections. She uses a Canon MG2920 printer, and a Cricut Maker for cutting. Using the Cricut Design Space software, which is included with the Cricut Maker machine, she arranged several elements to optimize printing on each sheet. Make sure you check the sizing of your elements so that they’ll fit properly in the pockets. Cassie used the 6×8 sized pocket sleeves from Simple Stories.


Aren’t those pocket pages just gorgeous!! Cassie used a mix of elements from the kit, and journal cards. Below are the printed embellishments she used. For best quality printing, she recommends using Epson Ultra Premium Presentation Paper Matte. While all of these elements can be cut by hand with scissors, she likes using a cutting machine for very precise edges. It took Cassie about an hour and 15 minutes to create these 2 pocket pages.


CT Member Jennifer also made a pocket page using the Reservations Artist Point collection. She created a 12×12 page using the vinyl sleeve pocket pages from Becky Higgins Project Life. Jennifer has an HP printer and uses Neenah cardstock paper purchased from Amazon. It took Jennifer approximately 30 minutes to complete this pocket page. I love how her journal cards provide both decoration to the page as well as space to document her memories. It’s fabulous!

So pretty! Jennifer used the 8.5×11 printable PDF files to print out the journal cards. She printed 3 sheets of journal cards and then cut them out by hand with scissors and a paper trimmer. Jennifer has a very steady hand and feels she can cut out anything with scissors. She also used Word to import and resize a paper and pocket element.


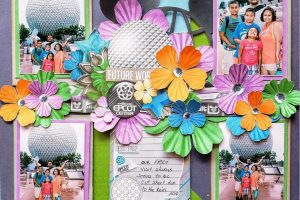
Next let’s take a look at Paper Layouts. CT member Esther is a wizard when it comes to printing, cutting and creating her paper pages. Esther uses a Canon Pixma for printing and a Cricut Maker for cutting. You have to look closely at this layout, it is NOT a digital layout, it’s all paper!! Esther used the Thanks For Noticing Me collection. On this layout, she used a large page starter on the bottom right, and lots of flowers layered over and tucked under other elements. Esther created a tutorial on her blog showing each step using her Cricut Maker. You can find the tutorial HERE.

Here’s the printed papers and embellishments from Esther. She prints on 110lb cardstock paper from Walmart. She recommends setting your printer to it’s highest quality setting. The adhesive she used was ATG Tape. From start to finish, with lots of interruptions in between, it took her about 2.5 hours to make this page.


These pages have just been printed, and are ready to feed through the Cricut Maker for cutting. The outer black rectangle boxes are the registration marks needed by the Cricut Maker for cutting.

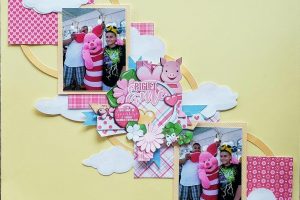
Check out the second paper layout she made. The large title is from the Word Flairs pack. I love how she stacked the papers under the photos. And that tail is adorable!


Leave a Reply
Your email is safe with us.
You must be logged in to post a comment.