Whether you’re a digital scrapper or paper scrapper, it takes a while to create a scrapbook layout. It’s fun to create a page from scratch, taking time to hand pick each element and paper. But what if you’re not so skilled with digital software or want a faster way of creating layouts? Then you’ll want to check out Quick Pages.
Quick Pages make it fast and easy to create a scrapbook page – either digital or paper. Quick Pages are pre-formatted, pre-decorated scrapbook layouts. There are “openings” in the page where you can add in your digital or printed photos behind the Quick Page. You can also add your own elements or journaling to the page. Quick Pages are PNG files sized at 12×12 at 300dpi. The PNG file is a “flattened” file format meaning there are no layers and you cannot move around any of the elements or decorations on a QuickPage.
Here’s 2 examples of Quick Pages. There’s typically room to add anywhere from 3-5 photos. Each page is filled with decorated elements, word strips, papers and titles.
How Can A Digital Scrapper Use A Quick Page?
Digital scrapbooking software is based on layers where certain layers are in front and others are in back. Once you import the Quick Page PNG, you’ll add in your photos “behind” the Quick Page layer and resize them so that the photos are seen in the open holes. Now you’re done and you can save your layout. If you want to add in more elements and decorations, you can add them “above” the Quick Page layer.
How Can A Paper Scrapper Use A Quick Page?
If you have a wide format printer, you can print out the Quick Page in 12×12 format. You can use scissors to cut open the photo holes, or instruct your cutting machine to cut around the photo holes. Then you just adhere your photos behind the Quick Page and that’s it! You can also resize your Quick Page to 8×8 so that it’s printable on an 8.5×11 standard paper.

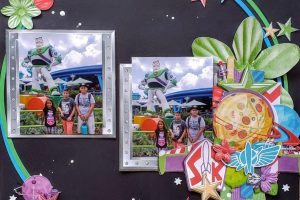
CT Member Shannon has a video tutorial where she demonstrates how to make a digital layout with a Quick Page using Canva. Click the link HERE to watch her YouTube video. This is her completed page using the Light Cycle Run collection, Quick Page 1. She added her 4 photos to the Quick Page. In the middle photo box, she added a grey paper and some journaling. Very simple and very fast. Now you’ve got a gorgeous layout!
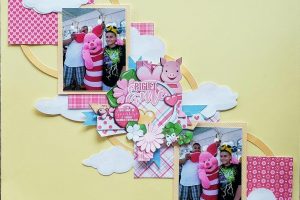
CT Member Theresa shares a video tutorial with a true hybrid version of making a paper layout with a Quick Page. She demonstrates how she organizes her photos and extra elements with Photoshop, then prints them out. She pastes lots of extra elements on top of the Quick Page and even covers up the decorative box on the top left with a different designs. Click the link HERE to watch her YouTube video. This is her completed page using the Edge Of The Galaxy collection, Quick Page 3. What a gorgeous Star Wars page, and it’s a paper layout!
What If You Don’t Have Enough Photos To Fill All The Open Spots?
Some Quick Pages may have more open photo spots than you need. You can always fill those spots with a paper, journal card, pocket, or other decoration.
Here’s an example using Reservation Ohana Quick Page 2. This Quick Page has 7 open spots, but I only had 5 photos. To fill the last 2 spots, I used a paper and an Ohana sign pocket. I also added the red Ohana quote snippet on the bottom right.
What If You Need More Photo Spots?
You can be very creative in ways to add or remove something on a Quick Page. Here’s an example using Reservation Tusker House Quick Page 3. The Quick Page is fabulous for scrapping the character meal, but I wanted a few more spots for photos. On the bottom row, I added a frame over the “Keep Calm” journal card as well as the zebra paper spot. That allowed me to add in 2 more photos. I also added the word tags saying Safari Mickey, Safari Goofy, and Safari Daisy.
What If You Want To Remove Some Decoration?
Quick Pages have lots of decorations. If you don’t like a cluster or element, you can always “erase it”, or layer another element over it. Here’s an example with Journey of Water Quick Page 1. The middle left photo spot has a lantern and ferns covering some of the spot. I wanted all of Te Fiti’s picture to show so I just erased those elements and put the Inspired By Moana circle flair near the edge and some water drops to blend in my erasing. I also added the Te Fiti yellow word tag, the #WaterJourney brown tag, and some journaling.

1 Comment
Leave your reply.